
Getting Started with JPRO and Connecting to a Vehicle

Related Product:
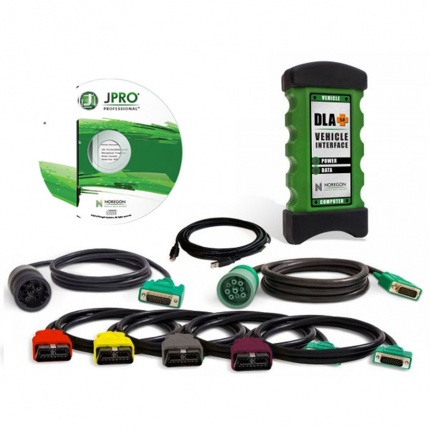
2025 V1 JPRO DLA+2.0 Diesel JPRO Diagnostic Service Kit Heavy Duty Truck Scanner with software
JPRO Professional truck scanner is the most comprehensive and powerful all makes, all models diagnostic tool available in the industry today. In one, easy annual subscription, JPRO provides a complete & unparalleled diagnostic s
To begin, power up your laptop and ensure you have an active internet connection. If you are using an LTE card, the connection should establish automatically.
Next, launch JPRO by double-clicking its desktop icon. You should see the JPRO home screen.
Connecting to the Vehicle
Set Up the Adapter
1. Connect the USB cable to the Computer port on the adapter.
2. Plug the other end into an available USB port on your laptop.

Select the Correct Cable
Use a color-coded cable based on the truck’s diagnostic port:
1. Heavy and medium-duty cables are color-coded.
2. Off-highway equipment cables are black.
2. For example, when connecting to an International Workstar, use the green 9-pin cable.
Connect the Adapter to the Vehicle
1. Attach the cable to the Vehicle port on the adapter.
2. Plug the other end into the vehicle’s diagnostic port, ensuring proper alignment.
3. Check the adapter lights—there should be a blinking data light.
Establishing the Connection
1. Turn the key to Key On, Engine On for full functionality.
2. Click Connect in the top-left of JPRO and select the appropriate connector.
3. The connection process will begin and take about a minute. You may hear clicking noises from the DLA adapter—this is normal.

4. In the top-left corner, JPRO will indicate it is acquiring vehicle data. Once complete, the toolbar at the top will illuminate, and the Acquiring Vehicle Details message will disappear.
At this point, you are successfully connected and ready to diagnose and troubleshoot the vehicle!